Published On - May 1, 2024
Hyperledger Web3J: The bridge between Decentralized Identity and EVM
In today's landscape, the momentum behind Web3 is clear across various industries. As we move into this new era, it's important to update our tools and methods to match the changing environment. During Web1, one of the key changes involved using authentication methods to verify users on specific websites for the first time.
Web2 introduced identity providers, allowing users to authenticate themselves using their social accounts. However, will this model endure in a Web3 environment? Not quite.
Enter Decentralized Identification, a hallmark of Web3. This paradigm shift eliminates the reliance on central authorities for credential verification. Instead, users have direct control over their credentials, deciding what information to share when proving their identity. This fundamental change empowers individuals, transforming the concept of digital identity in the Web3 era.
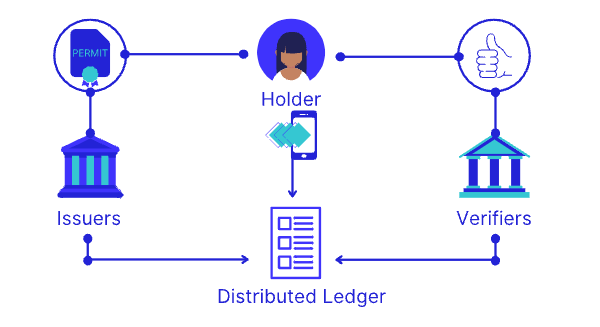
The World Wide Web Consortium (W3C) sets the standard for these identities, providing detailed information about Decentralized Identifiers (DID), Verifiable Credentials (VC), and Verifiable Presentations (VP). For further insights, readers can refer to our previous articles on Decentralized Identity:
- What’s Next for Blockchain? Decentralized Identity
- The Case for Decentralized Identity
- Looking Beyond Tokens — Verified Credentials
This article goes beyond theory to explore the practical side, demonstrating how Decentralized Identification can be seamlessly integrated into existing projects for effective use.
We'll showcase the process with the following steps:
- Creating a did:ethr DID.
- Querying its status on the Identity Registry within the network.
- Generating a Verifiable Credential.
- Finally, revoking the DID.
Through these practical examples, readers will gain a deeper understanding of implementing Decentralized Identification in real-world scenarios.
Getting started
In order to easily achieve the Decentralized Identity in your application you need to make sure you have the following:
- An Identity generator library for specific DID methods, DID documents, Verifiable Credentials, Verifiable Presentations, and at the same time provide the verification mechanism.
- A registry that holds the Identities in a blockchain network.
- A tool that can generate the necessary key pairs for encryption to create the identifiers mentioned earlier. This tool should also enable interaction with the blockchain network mentioned above.
For demonstrating this we will use the following tech stack:
- SpruceID library for generating decentralized credentials.
- The Ethereum Sepolia test network with ERC-1056 smart contract which will represent the Identity Registry in the network.
- Hyperledger Web3J to interact with the Identity Registry smart contract and generate the Elliptic Curve SECP-256k1 key pair. SpruceID to create the credentials.
Setting Up the Environment
Generate a new Java project. You can accomplish this using any popular IDE or generate it as a new HelloWorld application using the Web3j-CLI. We recommend using Gradle as a build tool for additional tasks, although Maven is also suitable.
Integrate SpruceID:
This library is written in Rust. To use it in our Java application, we'll have to build it locally. For this use the following tutorial for Java on the documentation site.
The steps are:
- git clone https://github.com/spruceid/ssi --recurse-submodules
- git clone https://github.com/spruceid/didkit
- cd didkit/
- cargo build
- From DIDKit root directory generate the Java Native Interfaces for to can interact from Java with SpruceID Rust library
make -C lib ../target/didkit.jar
6. From DIDKit root directory generate the entry point to the SpruceID Library which was built on the local machine.
Note: Please refer to the project's documentation to build the library for your platform, libdidkit.so on UNIX-like systems, didkit.dll on Windows, libdidkit.dylib on MacOS.
make -C lib ../target/release/libdidkit.so
Add the generated libs from 5 and 6 to the classpath.
Integrate Web3J:
If the Java application was created using Web3J-CLI, the Web3J Gradle plugin is automatically included. If not, you'll need to add it manually to the build.gradle file, as described below:
plugins {
  id("org.web3j") version "4.9.8"
}
Note: SpruceID will run only on Java 11, due to this Web3J is specified with version 4.9.8.
Integrate with Ethereum test network:
For this we will use the Ethereum Sepolia test network to deploy and interact with the smart contract ERC-1056. As mentioned above, we will use Web3J for the deployment and interaction with the smart contract.
First Generate the contract wrapper:
-
Add the solidity file in the solidity folder under the main module.
-
Run generateContractWrappers gradle task
Deploy the smart contract to the Sepolia test network by executing the tutorial steps here. Now everything is in place.
did:ethr
The did:ethr refers mainly to an Ethereum public address, which can be resolved to a DID document using a resolver entity. In this case, SpruceId provides a resolveDID method that can be used for this purpose.
For generating a new did:ethr we will execute the following code:
//the Sepolia network ID 11155111 in hex
String EVM_CHAIN_ID = 0xaa36a7

public String createEthrIdentity(Device device) throws Exception {
   	ECKeyPair ecKeyPair = Keys.createEcKeyPair();
   	String privateKey = Numeric.toHexStringWithPrefix(ecKeyPair.getPrivateKey());
   	String address = Numeric.prependHexPrefix(Keys.getAddress(ecKeyPair));
String did = "did:ethr:" + EVM_CHAIN_ID + ":" + address;
	return did;
}
The code above demonstrates how the Keys class from the Web3J utility module is used to generate the SECP-256k1 key pair for the new address. Once created, the new DID is formed by combining the prefix with the new key.
Note: EVM_CHAIN_ID specifies which network the resolver should check to resolve the DID.
The resulting DID should have the following format:
- did:ethr:0xaa36a7:0x19e03255f667bdfd50a32722df860b1eeaf4d635
If we had generated the DID for Ethereum Mainnet, it would be:
- did:ethr:0xaa36a7:0x19e03255f667bdfd50a32722df860b1eeaf4d635
Note: Remember to store the private key generated above for later use. You will need it when generating Verifiable credentials. As a best practice, encrypt it with an RSA key and store it in a private database until it is needed again.
Check ownership
Even if the DID was created off-chain using Hyperledger Web3J, it functions on the network like any other SECP-256k1 address by default. Therefore, there is no need to take any additional steps to add it to the Identity Registry. The registry automatically resolves all queries for newly generated did:ethr addresses because they are already associated with their respective owners.
public String checkOwner(String did) throws Exception {
Web3j web3j = Web3j.build(new HttpService(NETWORK_RPC));
FastRawTransactionManager transactionManager = new FastRawTransactionManager(web3j, Credentials.create(identity.getKeyUsed()), Numeric.toBigInt(DIDConstants.EVM_CHAIN_ID).longValue());

EthereumDIDRegistry registry = new EthereumDIDRegistry(REGISTRY_ADDRESS, web3j, transactionManager, new DefaultGasProvider());

String identityAddress = did.substring();

return registry.identityOwner(identityAddress).send();
}
In the above code, Hyperledger Web3J is querying the registry smart contract to retrieve the owner of the current DID.
Note: the identityAddress is obtained by removing the DID prefix (did:ethr:EVM_CHAIN_ID), which represents the previously generated public address. If the owner was not previously set, the method should return the saved address value as identityAddress by default. This means that every account is the owner of its own DID.
Generate Verifiable Credentials
Once the DID is generated and the owner's private key is available, access to the Decentralized Identity Space becomes possible. Verifiable Credentials (VCs) serve as digital representations of physical IDs in the Web3 space. For further understanding of their use case, please refer to the articles mentioned in the introduction section.
To generate VCs, we will utilize SpruceID and Hyperledger Web3J along with the private key generated earlier.
public String issueVerifiableCredential(String did, KeyPair keys, DataObject data){

final CredentialObject credential = new CredentialObject(did, did, data);

final DIDKitOptions options = new DIDKitOptions(PROOF_ASSERTION, identity.getVerificationMethod(), null, null);

final String credentialJson = MAPPER.writeValueAsString(credential);
final String optionsJson = MAPPER.writeValueAsString(options);


String jwk = generatePrivateJwk(keys);


final String verifiableCredential = DIDKit.issueCredential(credentialJson, optionsJson, jwk);
return verifiableCredential;
}
In the above code, DIDKit is the JNI interface located in the jar file that we added to the class path. It exposes the issueCredential method which receives the following arguments:
- credentialJson = is the body of the VC. Created from the CredentialObject, it includes the desired data that needs to conform to the VC schema. Refer to the SpruceId example for guidance.
- optionsJson = this refers to the type of assertions that Verifiable Credential will need to support during verification requests;
- jwk = is the Json Web Key format of the did:ethr’s key pair. Method generatePrivateJwk should contain the Web3J code which returns the private JWK, documentation here.
Once SpruceID receives the issueCredential request it will start to do the following:
-
Check if credentialJson respects the VC schema mentioned in @context;
-
Resolve the did:ethr in order to get the DID Document to check the JWK that was sent. Depending on the test network 2 options can take place:
-
If the SpruceId library resolve method is compatible with the network, the DID will be resolved.
-
If the library is not compatible, the resolver needs to be overridden with this custom resolver.
-
You can achieve this by cloning the repository and executing the npm command to start the resolver instance. After instance starts, redirect the SpruceId calls by overriding the DIDKit resolve actions to the new resolver.
3. After completing the first two steps, the system returns the verifiable credential.
From here, you can use it in verification calls, issuing new Verifiable Presentations, and more.
Revoke DID
A DID is revoked when its DID Document can no longer be retrieved. For most DID methods, this can be achieved by removing access to it. In the case of did:web, the access URL to the DID document is revoked. But what about did:ethrs when there is an Identity Registry on the network?
In this case, revocation of the DID will consist of changing the owner address to 0x0. By doing this, we indicate that only the address 0x0 can use it. However, as 0x0 is not a valid address that can be used, the DID is effectively revoked.
registry.changeOwner(identityAddress,"0x0").send();Hyperledger Web3J connects Decentralized Identity (DID) systems with Ethereum Virtual Machine networks, providing essential support for creating decentralized identities. Its interfaces make it easier to interact with the EVM network and generate necessary JWK keys for identity creation processes, such as those used in Spruce ID.