One of our goals at Web3 Labs is to make development on Ethereum as simple as possible. During the past three years, we have seen many teams (ourselves included) write RESTful services again and again on top of Web3j to provide straight forward integration with Ethereum for their server applications.
Earlier this year, we decided to do something about this, and are pleased to announce the
Web3j Open API project. This latest project allows you to easily take a smart contract and generate an OpenAPI compliant server application (with full OpenAPI docs via Swagger).
To learn more about how you can start thinking in terms of APIs rather than Ethereum integration code, read on!
The Web3j OpenAPI generator
Web3j-OpenAPI is an OpenAPI generator for Solidity smart contracts. It provides a way to interact with the Ethereum blockchain via simple and intuitive HTTP requests. These interactions can be done using plain HTTP requests or via the Swagger-UI, which is generated with every project.
The workflow can be summed in the following steps:
- Write a Solidity smart contract
- Generate the corresponding OpenAPI project using Web3j-OpenAPI
- Run the generated project as a standalone server
- Send HTTP requests using Swagger-UI or from a client application using our client implementation
Example
The following Hello World contract:
// SPDX-License-Identifier: Apache-2.0
pragma solidity ^0.7.0;
// Modified Greeter contract. Based on example at https://www.ethereum.org/greeter.
contract Mortal {
/* Define variable owner of the type address*/
address owner;
/* this function is executed at initialization
and sets the owner of the contract */
constructor () {owner = msg.sender;}
modifier onlyOwner {
require(
msg.sender == owner,
"Only owner can call this function."
);
_;
}
/* Function to recover the funds on the contract */
function kill() onlyOwner public {
selfdestruct(msg.sender);
}
}
contract HelloWorld is Mortal {
/* define variable greeting of the type string */
string greet;
/* this runs when the contract is executed */
constructor (string memory _greet) {
greet = _greet;
}
function newGreeting(string memory _greet) onlyOwner public {
emit Modified(greet, _greet, greet, _greet);
greet = _greet;
}
/* main function */
function greeting() public view returns (string memory) {
return greet;
}
event Modified(
string indexed oldGreetingIdx,
string indexed newGreetingIdx,
string oldGreeting,
string newGreeting
);
}
We can use the Web3j OpenAPI to create a RESTful service to deploy and seamlessly integrate with this application. A Swagger UI is included with the service so you can try it out easily.


Getting started
Create a new application
To generate an OpenAPI project using the Web3j-OpenAPI generator, you need to have the Epirus-CLI installed on your machine (Note - the Epirus CLI has replaced the Web3j CLI).
$ curl -L get.epirus.io | sh
To check if the installation was successful and you have the OpenAPI generator working, run the command:
$ epirus openapi import --help
You should see the generator help display:

In this article, we will be using the above Hello World contract. First, copy the above code in a file named HelloWorld.sol into a local directory.
Then, execute the following command:
$ epirus openapi import \
-s=HelloWorld.sol \
--package=com.tutorial \
--project-name=HelloWorldProject \
--output-dir=.
You should see output similar to the following:

This means that the OpenAPI project was generated successfully along with the SwaggerUI. Verify that you have a folder in your directory called HelloWorldProject.
If so, then you succeeded in generating your first OpenAPI project using Web3j-OpenAPI.
There are other ways to generate an OpenAPI project. Please check them in the documentation.
The next step is to run the project.
You can run the project effortlessly, without specifying any configuration, using the Epirus-CLI.
If not, you need to specify runtime parameters: for example, the private key or wallet file for the signing, the node endpoint to connect to, etc.
Configure the environment
To check all the available options, run the project with the --help flag:
$ cd HelloWorldProject
$ ./gradlew run --args="--help"
You will see the following display:

There are multiple ways to specify these parameters:
- Environment variables
- Configuration file
- Directly from the CLI
Here we will pass the parameters via environment variables, but you can read about the other options in the
docs.
To do so, run the following command:
$ export WEB3J_ENDPOINT=<link_to_your_Ethereum_node>
$ export WEB3J_PRIVATE_KEY=<your_private_key>
$ export WEB3J_OPENAPI_HOST=localhost
$ export WEB3J_OPENAPI_PORT=9090
Run the application
Run the application as follows
$ ./gradlew run
You should be able to run the server and see the following:

Interacting with the API
After running the project, you will have the endpoints defined, waiting for requests. To send requests we will be using the generated Swagger-UI.
Use SwaggerUI
The Swagger-UI can be accessed in the following link : http://<host>:<port>/swagger-ui.
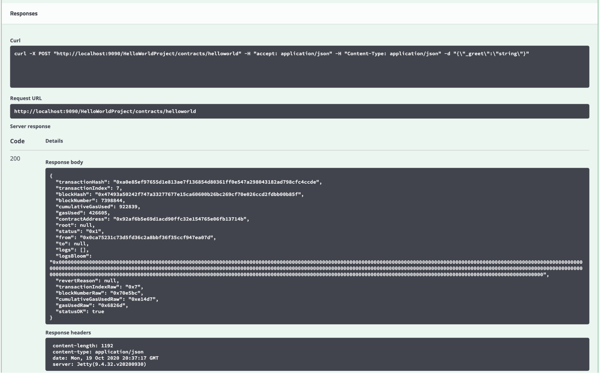
Then, use the endpoint POST /HellowWorldProject/contracts/helloworld to deploy your contract:
If the contract is deployed successfully, you should be seeing a transaction receipt model:

If not, you should be receiving an error message that you can either see in the response or in the server logs.
Then, I will be calling the greeting GET method via providing the contract address that we received in the previous transaction receipt:

You should see the following response:

Interact via Java/Kotlin
We can also interact with OpenAPI projects using a Java or Kotlin client.
To do so, start by adding the Web3j-OpenApi Client dependency to your project:
dependencies {
implementation "org.web3j.openapi:web3j-openapi-client:4.7.1"
}
Then, interact with the service as follows:
var service = new ClientService("http://localhost:9090");
var helloWorldProject = ClientFactory.create(
HelloWorldProjectApi.class, service
);
System.out.println("Deploying the HelloWorld contract...");
var deployParams = new HelloWorldDeployParameters("Hello");
var receipt = helloWorldProject.getContracts()
.getHelloWorld().deploy(deployParams);
System.out.println("Deployed contract address: " +
receipt.getContractAddress());
// Load the contract from the returned transaction receipt
var helloWorld = helloWorldProject.getContracts()
.getHelloWorld().load(receipt.getContractAddress());
// Change the greeting message
var newReceipt = helloWorld.newGreeting(
new NewGreetingParameters("Hello Web3j-OpenAPI")
);
System.out.println("NewGreeting transaction hash: " +
newReceipt.getTransactionHash());
// Check that the smart contract has been updated
var greeting = helloWorld.greeting().getResult();
System.out.println("Greeting method result: " + greeting);
Depending on the network you are using, the deployment might take some time.
Handling events
In a nutshell, SSE is a one-way mechanism that allows a server to asynchronously push data from the server to the client once the client-server connection is established by the client.
To query events from Kotlin/Java, add the Web3j-OpenAPI-client dependency as done above. Then, use the following code:
var countdownLatch = new CountDownLatch(1);
// Start listening for events
helloWorld.getEvents().getModified().onEvent(e -> {
System.out.println("Received event: " +
modifiedEvent.getNewGreeting());
countdownLatch.countDown();
});
helloWorld.newGreeting(new NewGreetingParameters(
"This will trigger a modified event"));
countdownLatch.await(); // Waits for the event
Then run this code. You should be able to see events printing on the screen.

Conclusion
There you have it, a demonstration of how easy it is to start spinning up API endpoints for your smart contracts. Given the ease with which they can now be generated, we hope you can start thinking in terms of APIs for your Ethereum integrations rather than nasty integration code that has been the norm up until this point.
If you want to run these applications without having to think about containerization, wallets, funding, and network connectivity, I encourage you to take a look at our Epirus Platform which can create and run OpenAPI projects in two commands!


